How to Deploy Angular SSR on Cloudflare Workers
A step-by-step guide to creating an Angular SSR application and deploying it to Cloudflare Workers using the Wrangler CLI and GitHub integration.
 Santosh Yadav 4 Sept 2026 13 min read
 Hey friends, hope you have been doing great. A few weeks back I was experimenting with Angular SSR on Cloudflare Workers, and thought of sharing how to deploy an Angular SSR application on Cloudflare Workers.
TLDR: Switch Angular’s server entry from @angular/ssr/node to @angular/ssr, set platform: neutral in angular.json, add a wrangler.jsonc, and deploy with wrangler deploy or the Cloudflare GitHub integration. That is all you need to run Angular SSR on Cloudflare Workers.
In this guide I break down every step, from a fresh Angular app to a running Worker. We will cover the Wrangler CLI setup, the platform: neutral build option, SSG with prerendered routes, and deploying to Cloudflare’s serverless edge network. You need Node 22 or newer, pnpm, and a free Cloudflare account.
What we are going to do is build an Angular SSR application, expose an API endpoint, and prerender a few pages so we can verify SSR and SSG both on Cloudflare Workers.
Getting Started
There are multiple ways to create a new application and make it compatible with Cloudflare Workers.
We will see both approaches.
Adding Workers support to an existing app
Let’s create a new Angular app and add the config needed to run the Angular SSR app on Cloudflare.
- Run the below command to create a new Angular app.
pnpm dlx @angular/cli@latest new test-ngapp --package-manager pnpmThe command will ask you a few questions
- Which stylesheet system would you like to use?- Do you want to enable Server-Side Rendering (SSR) and Static Site Generation (SSG/Prerendering)?- Which AI tools should Angular integrate with? https://angular.dev/ai/develop-with-aiRemember we want to answer Y for the SSR question.
Now you have a new Angular app created with SSR, but unfortunately this will not work on Workers.
Why it does not work
Open src/server.ts, which contains the imports from @angular/ssr/node and express as shown below. Some code is removed to reduce noise.
import {  AngularNodeAppEngine,  createNodeRequestHandler,  isMainModule,  writeResponseToNodeResponse,} from '@angular/ssr/node';import express from 'express';import { join } from 'node:path';
const browserDistFolder = join(import.meta.dirname, '../browser');
const app = express();const angularApp = new AngularNodeAppEngine();

/** * Start the server if this module is the main entry point, or it is ran via PM2. * The server listens on the port defined by the `PORT` environment variable, or defaults to 4000. */if (isMainModule(import.meta.url) || process.env['pm_id']) {  const port = process.env['PORT'] || 4000;  app.listen(port, (error) => {    if (error) {      throw error;    }
    console.log(`Node Express server listening on http://localhost:${port}`);  });}
/** * Request handler used by the Angular CLI (for dev-server and during build) or Firebase Cloud Functions. */export const reqHandler = createNodeRequestHandler(app);
I hope you see the above code, the imports are from Node.js APIs. Let’s break down the issue.
import { AngularNodeAppEngine, createNodeRequestHandler, isMainModule, writeResponseToNodeResponse,} from '@angular/ssr/node';import express from 'express';Angular uses Node-based APIs and Express to serve the application, but Workers support only a subset of the Node.js API. The Cloudflare docs list what is available.
So it means we need to use the non-Node.js APIs from Angular. Angular exposes them too, but by default we get the app with Node.js APIs.
You will find the sample code for the non-Node.js version on Angular docs
import {AngularAppEngine, createRequestHandler} from '@angular/ssr';const angularApp = new AngularAppEngine();/** * This is a request handler used by the Angular CLI (dev-server and during build). */export const reqHandler = createRequestHandler(async (req: Request) => { const res: Response | null = await angularApp.handle(req); return res;});If you notice, the above code has no Express or Node.js-based APIs. This is what we need so we can run the server on Cloudflare Workers.
Let’s expose an API endpoint on the server so we can use it on our frontend.
import { AngularAppEngine, createRequestHandler } from '@angular/ssr';
const angularApp = new AngularAppEngine({  // It is safe to set allow `localhost`, so that SSR can run in local development,  // as, in production, Cloudflare will ensure that `localhost` is not the host.  allowedHosts: ['localhost'],});
function json(data: unknown, status = 200): Response {  return new Response(JSON.stringify(data), {    status,    headers: { 'Content-Type': 'application/json' },  });}/** * This is a request handler used by the Angular CLI (dev-server and during build). */export const reqHandler = createRequestHandler(async (request) => {  const url = new URL(request.url);
  if (request.method === 'GET' && url.pathname === '/api/data') {    return json({      message: 'This is the root endpoint. You can define your API endpoints here.',    });  }
  const res = await angularApp.handle(request);
  return res ?? new Response('Page not found.', { status: 404 });});
export default { fetch: reqHandler };
Let’s break down what we did here. We are not using any server-side framework, so we wrote our own json wrapper
function json(data: unknown, status = 200): Response { return new Response(JSON.stringify(data), { status, headers: { 'Content-Type': 'application/json' }, });}and defining our own router. Here we defined the /api/data endpoint
  const url = new URL(request.url);
  if (request.method === 'GET' && url.pathname === '/api/data') {    return json({      message: 'This is the root endpoint. You can define your API endpoints here.',    });  }
And the below code is Angular’s middleware redirecting the request and getting the response back.
The allowedHosts: ['localhost'] option lets SSR run against your dev server; in production Cloudflare sets the real host, so localhost never reaches the Worker.
const res = await angularApp.handle(req);Now go ahead and serve the application using pnpm start
Once the app is running, visit http://localhost:4200/api/data (or your different port) and
you should see the below response
{"message":"This is the root endpoint. You can define your API endpoints here."}Perfect, the API is working fine. Let’s consume the API on the frontend. We can use HttpClient or resource-based APIs.
Let’s open src/app.ts and add the below code
import { JsonPipe } from '@angular/common';import { httpResource } from '@angular/common/http';import { Component } from '@angular/core';
@Component({  imports: [JsonPipe],  selector: 'app-root',  styleUrl: './app.css',  templateUrl: './app.html',})export class App {  data = httpResource(() => '/api/data');}
and make the below changes to src/app.html
@if(data.hasValue()) { {{data.value() | json }}}Let’s restart the server and visit http://localhost:4200/. You should see the response from the API.
The same handler can hold more routes: a D1 query, a KV lookup, or a call to an LLM through Workers AI. Every binding you declare in wrangler.jsonc is available on the request context.
Prerender a route
We have our API available and it’s time to add a page that can be prerendered.
We need a few components. Let’s use AI. You can use the below prompt to add everything we need
Add three pages to the existing Angular app:
1. A **FAQ page** at `/faq` with an accessible accordion (`<dl>`/`<dt>`/`<dd>`, `aria-expanded`/`aria-controls`, signal-based toggle).
2. A **Product page** at `/product` with a grid of pricing cards (Starter $9/mo, Pro $29/mo, Enterprise contact us).
3. A **Landing page** as the default route (`/`) with a hero section (heading, tagline, CTA buttons to Product and FAQ) and a 3-column feature grid.
All routes should be lazy-loaded with `loadComponent` and default exports. Add a nav bar in the app shell with Home, Product, and FAQ links above the `<router-outlet>`. Add server routes in `app.routes.server.ts` with `Prerender` for FAQ and Product, and `Server` as the `**` fallback.
To check if prerendering works locally, let’s run pnpm build and open dist/prerendered-routes.json. Notice that dist/browser/product/index.html and dist/browser/faq/index.html now exist.
The dist/prerendered-routes.json contains the routes that were prerendered.
{ "routes": { "/faq": {}, "/product": {} }}You can control which routes are prerendered, rendered on the server, or run on the client. Open src/app/app.routes.server.ts and try changing the renderMode property to RenderMode.Prerender or RenderMode.Client, then run pnpm build to verify the files mentioned above.
NOTE RenderMode.Client renders the route in the browser and does not create route-specific static HTML files.
import { RenderMode, ServerRoute } from '@angular/ssr';
export const serverRoutes: ServerRoute[] = [  {    path: 'faq',    renderMode: RenderMode.Prerender,  },  {    path: 'product',    renderMode: RenderMode.Prerender,  },  {    path: '**',    renderMode: RenderMode.Server,  },];
The real use case for prerendering is any page whose content does not change between deploys, marketing pages, documentation, or blog posts that are static once published.
Understanding wrangler and build config
Changing the server code alone will not let us run it on Workers. The build output Angular produces still has to be converted into a Workers-compatible format.
This is where the wrangler CLI comes into the picture. But before you can deploy the app on workers, you need to make 2 more changes.
- Adding the
platform: neutralinssroptions inangular.json
"ssr": { "entry": "src/server.ts", "platform": "neutral" },What does it do?
Angular supports two options, node and neutral. node is the default and makes Angular emit code that uses the Node.js APIs.
For Workers and serverless environments where Node.js APIs are not available, neutral is what you should prefer.
We are halfway there. The last part is adding and installing Wrangler.
- Install Wrangler:
pnpm add -D wrangler@latest
and add wrangler.jsonc in the root
{ "$schema": "node_modules/wrangler/config-schema.json", "name": "test-ngapp", "main": "./dist/server/server.mjs", "compatibility_date": "2026-08-31", "observability": { "enabled": true }, "assets": { "binding": "ASSETS", "directory": "dist/browser" }}Using wrangler setup
The above steps explain what goes on behind the scenes to make this app compatible with Workers or serverless platforms.
Do you need to follow all the steps manually? The answer is no.
You can run npx wrangler setup in the existing Angular SSR app to make it compatible with Workers.
Once you run the command, you should see similar output, which is what we did manually above.
The one thing wrangler setup does not do is add custom API routes. You still need to add the /api/data endpoint and the json helper to server.ts yourself, as we did in the earlier section.
npx wrangler setupNeed to install the following packages:wrangler@4.128.0Ok to proceed? (y) y
 ⛅️ wrangler 4.128.0────────────────────
Detected Project Settings: - Worker Name: test-ngapp - Framework: Angular - Build Command: pnpm run build - Output Directory: dist/
✔ Do you want to modify these settings? … yes✔ What do you want to name your Worker? … test-ngapp✔ What framework is your application using? › Angular✔ What directory contains your applications' output/asset files? … dist/✔ What is your application's build command? … pnpm run build
Updated Project Settings: - Worker Name: test-ngapp - Framework: Angular - Build Command: pnpm run build - Output Directory: dist/

📦 Install packages: - wrangler (devDependency)
📝 Update package.json scripts: - "deploy": "pnpm run build && wrangler deploy" - "preview": "pnpm run build && wrangler dev" - "cf-typegen": "wrangler types"
📄 Create wrangler.jsonc:  {    "$schema": "node_modules/wrangler/config-schema.json",    "name": "test-ngapp",    "main": "./dist/server/server.mjs",    "compatibility_date": "2026-08-31",    "observability": {      "enabled": true    },    "assets": {      "binding": "ASSETS",      "directory": "dist/browser"    }  }
🛠️  Configuring project for Angular✔ Proceed with setup? … yes├ Installing wrangler A command line tool for building Cloudflare Workers│ installed via `pnpm install wrangler --save-dev`│├ Updating angular.json config│ updated `angular.json`│├ Installing additional dependencies│ installed│├ Adding Wrangler files to the .gitignore file│ updated .gitignore file│🎉 Your project is now setup to deploy to CloudflareYou can now deploy with npm run deploy
Once your app is Worker-ready, you can start the deployment. You can do it via the command line as mentioned at the end of the output above, or use the GitHub integration.
NOTE
There are two very important options in wrangler.json which we need to understand: compatibility_date and compatibility_flags. These options exist because the Workers team keeps updating the Workers runtime, and this is applied to all workers globally. Though there are rare chances it may break your deployment, it may happen.
Using compatibility_date and compatibility_flags you can control if you want to enable any feature for your deployment. You can see in our example we are using "compatibility_date": "2026-08-31" and we are not using compatibility_flags as we are not opting-in for any upcoming features.
Deploying the Worker app using GitHub integration
Cloudflare Workers give you a preview deployment for each branch. The free plan is generous for hobby and small-scale projects.
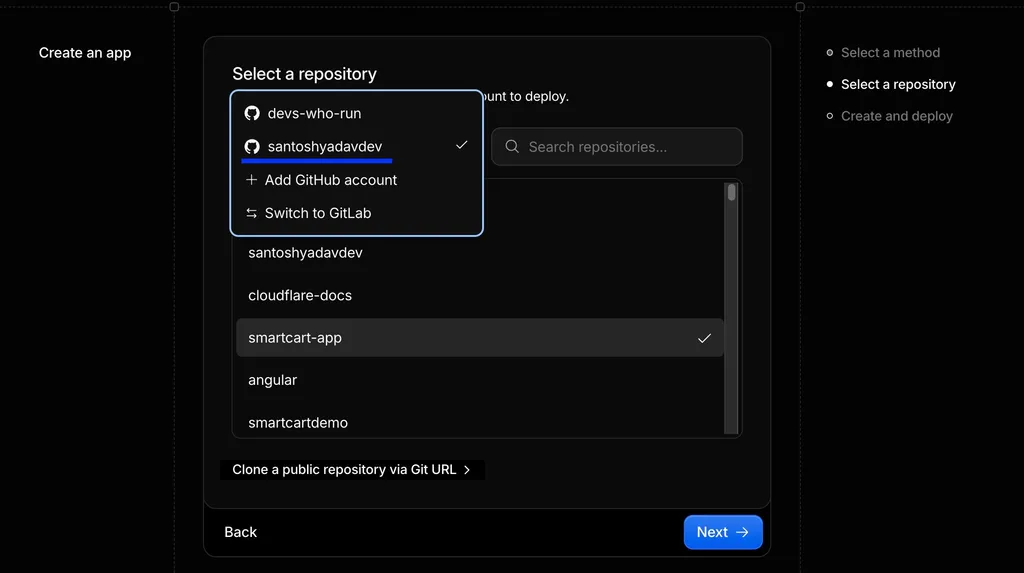
Let’s see how to do it. Make sure you have created a repository on GitHub and pushed the code.
- Create a new Cloudflare account by visiting the dashboard
- If you already have an account, log in on Cloudflare
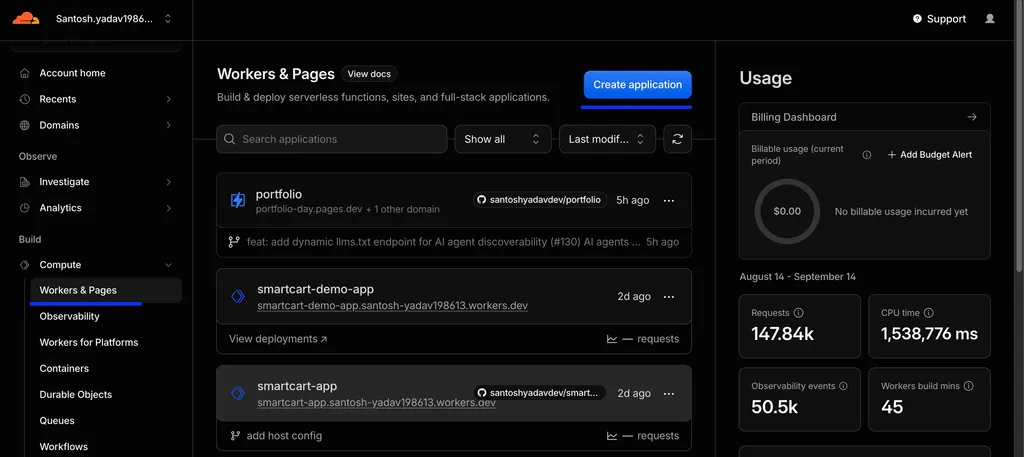
- Click on Compute › Workers & Pages and click on the Create Application button
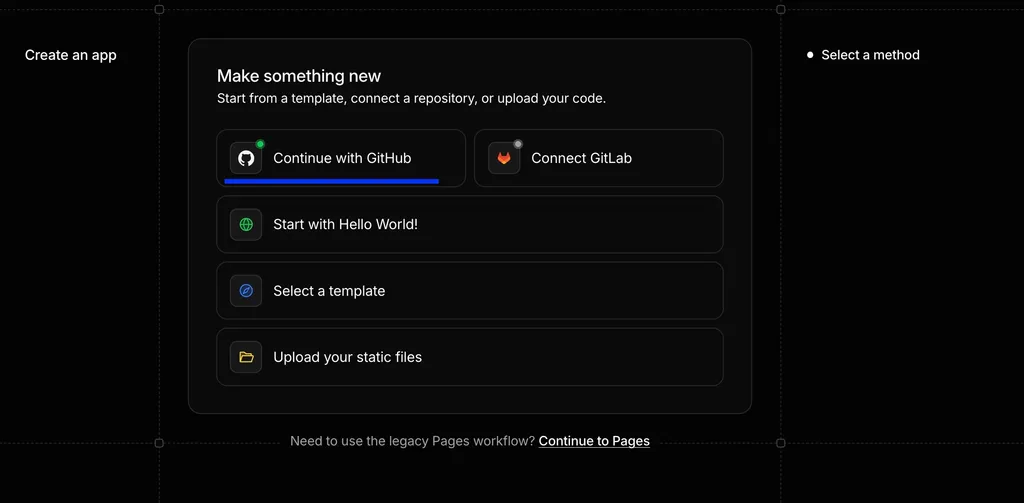
- Next, we need to select a method to deploy the application. Select Continue with GitHub
- Now we need to select the account and repo and click Next
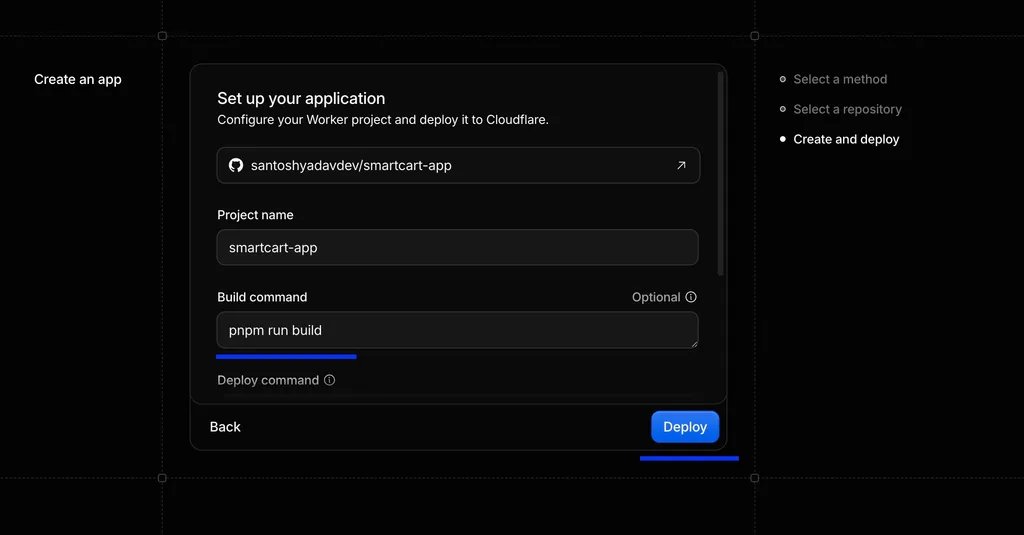
- Cloudflare will pick up the build command and all config needed, click on Deploy
- When the deployment turns green, the log ends with the URL of your Worker:
Deployed test-ngapp-worker triggers (0.86 sec)https://test-ngapp.<your-subdomain>.workers.dev
Current Version ID: 8451a566-5f92-4e0a-808e-3d7fd820dfee
Click on the URL and you should see the app you published. You should also see the prerendered product and faq pages.
NOTE
If you get an error related to the host when using the URL above, go ahead and add the host URL to your angular.json
"security": { "allowedHosts": ["test-ngapp.<your-subdomain>.workers.dev"] },Enable previews and custom domain
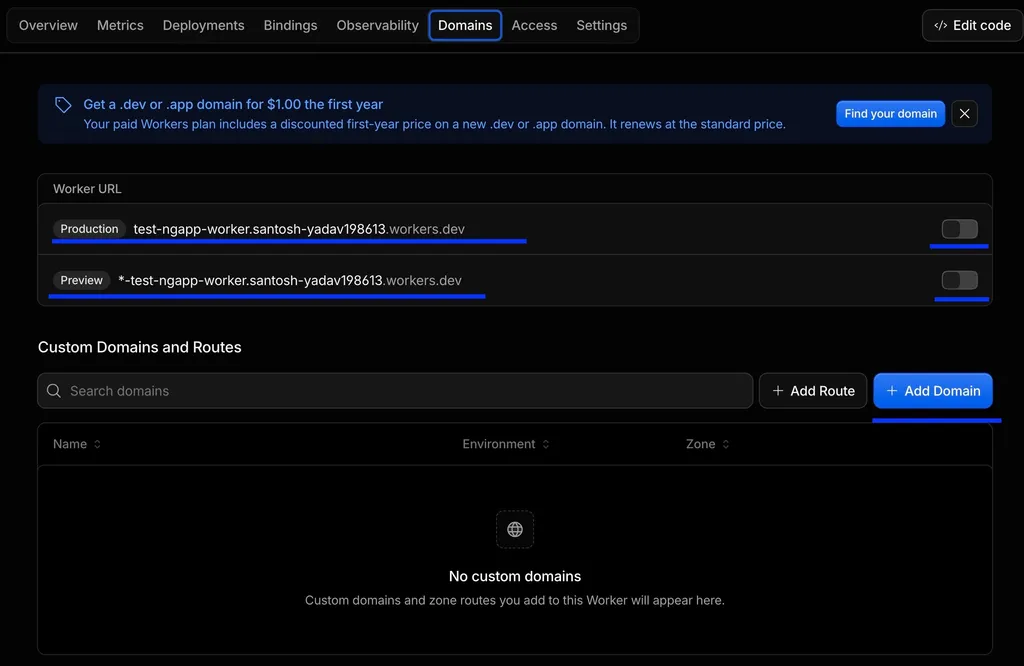
The next step is to enable the preview URLs. You can also assign a custom domain if you have one.
Click on the Domains tab and you can find all the details as shown below, and click on the toggle button next to preview URL
Using create-cloudflare
If you want to get started directly with Cloudflare, you can skip the entire above setup, no need to create a new Angular app and run wrangler setup.
Run create-cloudflare with the command below.
pnpm create cloudflare@latest test-ngappThe command asks what you want to build. Select Framework Starter.
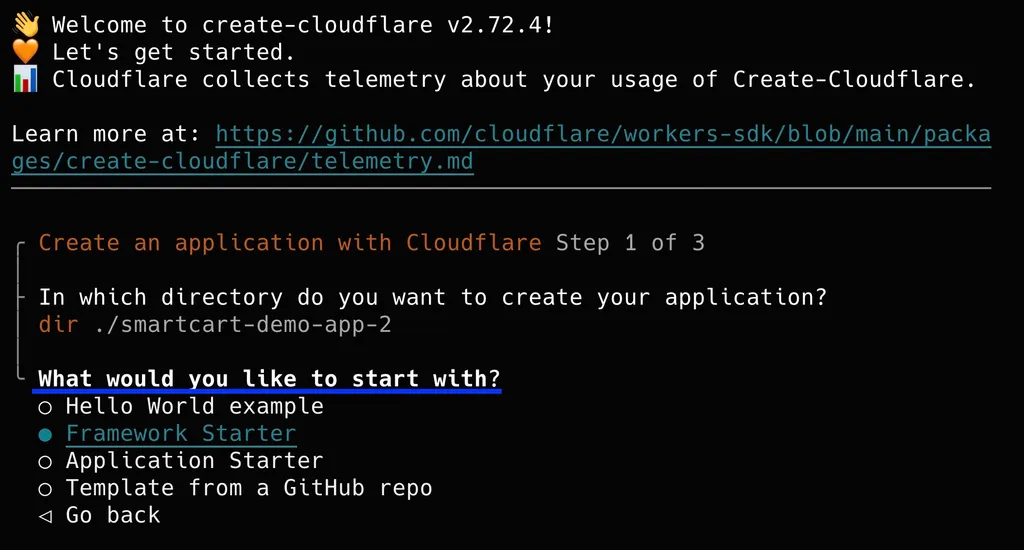
And on the next step choose Angular
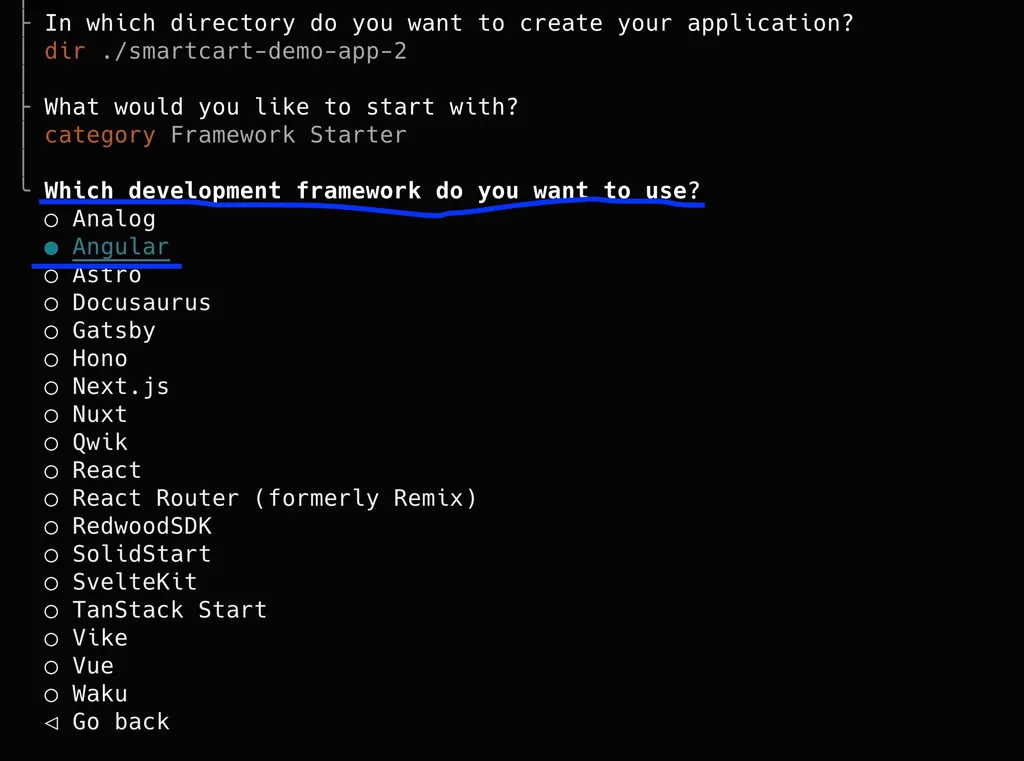
The create-cloudflare will create a new Angular SSR app, run the wrangler setup and wrangler deploy commands for you.
Frequently Asked Questions
Can I use Angular SSR on the Cloudflare free plan? Yes. The Workers free plan includes 100,000 requests per day, which is more than enough for hobby and small-scale projects.
Do I need to rewrite my entire server to deploy on Workers?
No. The main change is replacing the Node.js-based imports (@angular/ssr/node and Express) with the platform-agnostic @angular/ssr imports and setting platform: neutral in angular.json.
What is the difference between wrangler setup and create-cloudflare?
wrangler setup converts an existing Angular SSR app to be Workers-compatible. create-cloudflare scaffolds a brand-new Angular app that is already configured for Workers from the start.
Can I use prerendering (SSG) and server-side rendering together?
Yes. Angular’s app.routes.server.ts lets you set RenderMode.Prerender for static routes and RenderMode.Server for dynamic ones. Both work on Cloudflare Workers.
Wrapping Up
Go ahead and start building with Angular SSR on Workers, and share it with the world. If you have any questions or run into issues, feel free to reach out to me on Bluesky or X.
Thanks to my friends Serkan and Ankit for reviewing the article.
Shout out to my GitHub Sponsors and Subscribers for supporting my work on Open Source.